Monday, 3 September 2012

Wee cow, big geese.

I have been mauled by a cow.  Luckily, she only comes up to my knee and was just playing.  Hopefully she will have grown out of it by the time she's a quarter ton!  We're babysitting "Rosalie", our friend's Dexter, which is to be her house cow in a year or two.  Super cute.


We have also been very kindly given a trio of geese by other friends who don't want them any more, proving again that it's who and not what, you know.  Should give us a gaggle of goslings every year to sell/swap, and I can finally, finally try my idea for rum-marinaded applewood smoked goose for Christmas next year!


Apart from that, working on the render, pointing, mowing, etc, etc.  Same as.

Sunday, 12 August 2012

Lime... more lime.

Started the second coat and have discovered a new level of hard work.  I am amazed (again) at the stamina and fortitude of people before telly and cars came along and ruined everything.  Here's the method I am using:

3 buckets of sharp sand in the mixer, which needs to be tilted forward a bit so the mix doesn't get stuck to the back of the drum.
Add a bucket of lime and stand back so you don't breathe in the clouds of dust and get a lung full of mischief.
Add 8 litres of water - not "about 8 litres" or render falls off.
Wait until it is all mixed nicely, then stand over the mixer with a handful of hair and tease it in strand by strand.  NO CLUMPS or the render will fail.  This is a 20 minute job.
Turn off mixer and wait one hour.
Turn on mixer and add just enough water to get a paste.  This amount is different every day because lime and life is fickle.  Too much water, render falls off.  Too little water, render falls off.  Wall too wet, render falls off.  Wall too dry, render falls off.  Air damper than yesterday?  Less water needed.  Air drier?  Bit more water needed.  Sand a bit drier than yesterday?  A bucket of dry sand has up to 30% more sand in than a bucket with slightly damp sand in it.  This means you need more lime.  Too much sand, render falls off.  Too little, render falls off.  Well, not really but you get the idea.


It is a bugger.  4 metres squared done in 6 hours of crying, sweating, cursing and praying. 


This is the proper way to do it and it'll get faster when I get my hand in a bit more.  Everything worthwhile's hard to begin with.

Friday, 10 August 2012

August.

Been mostly rendering but that's a separate post so here's some pretty pictures.

 Veg.

 Fruit and fartichokes.

 Considerably more runner beans than thou.

 Wors teas.  8 in the freezer, 4 to go.

 250 or so leeks.

 Polytunnel with lots of nice things.

 Onions and firewood drying nicely.

 Chaos/building site/lazy bastard not cleaned up again.

 Garden and orchard with bugger all fruit in it.

Super sharp plot shot.

Too busy to listen to wedding CD music!  Got to get on!  Render Rant coming up soon!

Sunday, 24 June 2012

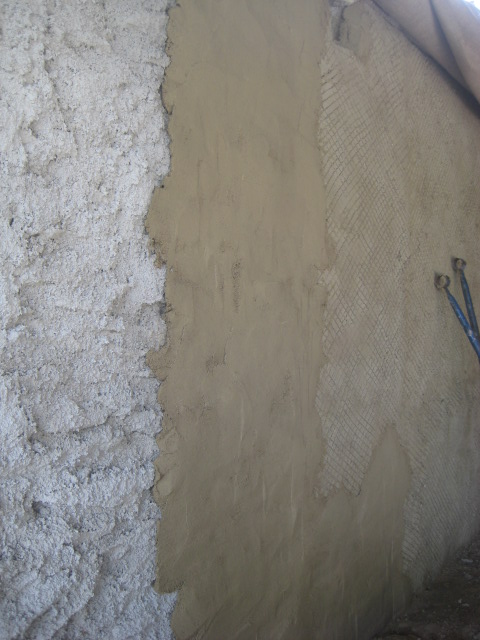
Lime rendering begins.

Fear not with your 1970's council house cement pebble-dash wall fears, it will dry to become white and this is only the first coat of three anyway.  It will end up a nice subtle creamy-white like the earth mortar on the left.


Another rainy, windy day so to avoid housework I have started on the render on the back wall because it's inside the hangar and dry.  Reasonably dry.  Brush down wall, but not too much or there will be no wall left. Spray with hose - using a mister on this wall would take all week due to the amazingly thirsty mud mortar and super porous stone.  The key is to experiment with a wee patch first to avoid catastrophe.  Hopefully.


Coat no.1 is a mix of NHL 3.5 lime and coarse sand, ratio 1 lime, 2 sand, 0.6 water.  It is then rested a bit  and then put back in the mixer when more water is added to make a slurry the consistency of cow shit.  You then chuck it on the wall using your best tennis forehand technique, remembering to put a hard board below to catch it all when it falls off again.  This is normal.  Also cover everything with plastic sheet and cardboard as it goes everywhere.  Fling it on little by little, and after 3 hours of mixing and chucking and slurping tea you get the above mess.  Belters.  Do not touch it afterwards - leave it sagging.  Mist twice a day for 4 days and protect from sun/wind/rain/cats, then on to the second coat (later).  Nothing to it!  No need for builders and their short-cuts, mess and expense, no need for cement (very bad stuff).  Local, sustainable, vernacular, self-sufficient, and you get big forearms.

Friday, 15 June 2012

Bread oven chimney down and out


Took forever to get the top off as it was solid concrete.  I managed to get it into three lumps and could just about manage to get them off the top of the chimney stack and resting on my chest like some bloody strongman, wobbling about up a creaking scaffold.  I had to work myself up into a temper to throw them off the top, which must have been amusing for any passers by.  Not that there are any passers by.  Ever.

'AlrightcomeonyoufuckingbastardsandLIFTYOUCUNT-FUCKOFFTWAT!'
weeeeeee-THUD.


Nice alignment.  Might have to dig them out of the lawn...
Then it came down ok as the rest was rubble and mud and I didn't even need a crowbar for most of it!
Upside down house.  Thick hard heavy concrete on top, soft stone and mud below.  Bloody peasants.

Found a use for some old CDs as well.  Always thinking, me.


Pigeons hear that sub-bass and robot-dance themselves to death.  Word.

Sunday, 10 June 2012

What Phill needs for breakfast.

Get it down you with a greasy egg sarnie!

Saturday, 9 June 2012

A bit of a roof.

One side nearly done.  I made the mistake of pre-cutting the wood on the level floor and then wondered why it just would not fit up there.  Turns out the roof is skewed and the old wood was just wangled in by eye.


The old super-thin slates were turning to compost in our hands so it was a devil of a job to get the old and new to fit together.  The new wood was also a bit thicker so there is a wee bump where the join is, and the line of slate hooks looks a bit wobbly.  Still, not too bad for a first attempt, but I wish we'd been able to spend longer measuring.  Was chucking it down though, so a waterproof roof is better than half a roof neatly done and a wet bedroom!

Nice tight scarfing over the supports.  All oak.

I had to use Spanish slate in the end as no-one produces Breton slate any more.  Pity - the older buildings around here have it and it looks fine to me!

Oak and thick hard slate and stainless steel fixings = a repair job in 200 years or so.