Wednesday 21 November 2012

November pics

New trees planted (thanks Polly).  Orchard now full.


Busy mulching and covering beds for winter.  Brassicas crap - caterpillars and slugs and lack of vigilance to blame.  Roots good.  Leeks ok but splitting in this wet weather.


Geese noisy, dirty and (I imagine) happy with about quarter of an acre to waddle about in.


Monday 29 October 2012

House blog

I'm doing a separate blog about the renovation because it's a whole new subject.  I will keep this for pretty pictures of cabbages and such.  Link on left.

Saturday 27 October 2012

The Final Render Frontier

Just finished the slating and thought I'd put some pics on.  Quite pleased with it although there are some mistakes.  Can't see them unless you're looking though, so ne bother.


Still got to sort the damp wall out though, so next week I shall be at it with a spade and pick, making a drain.  See tide mark below.  Also have to tidy up the window area but that'll wait until new windows are put in next year.  Oak so they shall be.  Unpainted.  Double-glazed.  Sand and linseed mastic - no squirty foam.  Opening OUT so the rebate's on the right side and no water gets in and we can have nice latch thingies to hold them open a wee bit so steam escapes from the kitchen and doesn't soak into the walls causing dry rot.  Revolutionary.


How it looked after I knocked the render off:


Friday 19 October 2012

Cracks

Just a quick entry to say the cracks have disappeared!  Looks like the lime has healed itself, saving me a job.

Wednesday 17 October 2012

Render finished.

I have been working on this since February so I am a bit relieved!  Some small hairline cracks to address but literally a dozen and I think it's because I made the mix too rich.  I was following a recipe in the Building with  Lime book (2:1.5!) and did the back wall but changed it to 2:1 for the other walls and scoured it more when loads of cracks appeared on the first wall I did.  Not bad for a first attempt though - and hopefully my last attempt as well!

Wind got up last night and tore off all the hessian covering but apart from some small stains from the oak roof timbers, all is well!  I expected to see most of it on the floor this morning but it's held up.  So far.  Next is to cover the end timbers with slate, then dig some drains...

First wall we did.  Note the joins.  Hopefully it will blend in a bit when it cures fully.  Maybe some trellis if it doesn't.


View of the back and side.  The join looks ok - again, I hope it will blend in a bit when cured.  If not, I will paint it all the same colour, but I will have to lime-wash the bottom and Sandtex the cement top so it will still be a bit iffy...


Detail of the corbels on the front sides.  Quite pleased with these.


I wanted an open-grained texture on the walls and settled on a "rag-rub" finish with the idea that a bunched-up ball of hessian would follow the undulations of the wall and give the desired effect.  It kind of worked but I also needed to float it off with a wooden float beforehand to help consolidate the render as it was cracking a lot when it was setting.  A lot of work, so it was.  Cramped hands, so I have.  If I was to do it again, I'd harl all the coats on and just take the big lumps and undulations off with a wooden batten.  I would probably do this:

Harl Method for Lazy Bastards
Coat 1: lime to coarse, gritty sand 1:2
Coat 2: lime to coarse sand with a handful of hair per load 1:2.5, levelled slightly when "green hard"
Coat 3: lime to coarse sand 1:3

Each wall done all at once, finishing about 30cm around each corner of the building to prevent funny edges.

What I did was far too hard for one (occasionally two) person to do who had no previous experience.  Learning on the only and most important job you're likely to do is a wee bit daft.  Do a course and help someone with experience on a couple of other jobs first if you can: an extra month out of nine isn't going to make a lot of difference to the schedule!  Also, ideally you need three people - one to mix, one to render, one to finish.  Everyone works differently and mixing work styles on the same job is asking for variations in the work unless you've worked together for years.

Still, I am looking forward to doing the inside!  Madness!

Monday 3 September 2012

Wee cow, big geese.

I have been mauled by a cow.  Luckily, she only comes up to my knee and was just playing.  Hopefully she will have grown out of it by the time she's a quarter ton!  We're babysitting "Rosalie", our friend's Dexter, which is to be her house cow in a year or two.  Super cute.


We have also been very kindly given a trio of geese by other friends who don't want them any more, proving again that it's who and not what, you know.  Should give us a gaggle of goslings every year to sell/swap, and I can finally, finally try my idea for rum-marinaded applewood smoked goose for Christmas next year!


Apart from that, working on the render, pointing, mowing, etc, etc.  Same as.

Sunday 12 August 2012

Lime... more lime.

Started the second coat and have discovered a new level of hard work.  I am amazed (again) at the stamina and fortitude of people before telly and cars came along and ruined everything.  Here's the method I am using:

3 buckets of sharp sand in the mixer, which needs to be tilted forward a bit so the mix doesn't get stuck to the back of the drum.
Add a bucket of lime and stand back so you don't breathe in the clouds of dust and get a lung full of mischief.
Add 8 litres of water - not "about 8 litres" or render falls off.
Wait until it is all mixed nicely, then stand over the mixer with a handful of hair and tease it in strand by strand.  NO CLUMPS or the render will fail.  This is a 20 minute job.
Turn off mixer and wait one hour.
Turn on mixer and add just enough water to get a paste.  This amount is different every day because lime and life is fickle.  Too much water, render falls off.  Too little water, render falls off.  Wall too wet, render falls off.  Wall too dry, render falls off.  Air damper than yesterday?  Less water needed.  Air drier?  Bit more water needed.  Sand a bit drier than yesterday?  A bucket of dry sand has up to 30% more sand in than a bucket with slightly damp sand in it.  This means you need more lime.  Too much sand, render falls off.  Too little, render falls off.  Well, not really but you get the idea.


It is a bugger.  4 metres squared done in 6 hours of crying, sweating, cursing and praying. 


This is the proper way to do it and it'll get faster when I get my hand in a bit more.  Everything worthwhile's hard to begin with.

Friday 10 August 2012

August.

Been mostly rendering but that's a separate post so here's some pretty pictures.

 Veg.

 Fruit and fartichokes.

 Considerably more runner beans than thou.

 Wors teas.  8 in the freezer, 4 to go.

 250 or so leeks.

 Polytunnel with lots of nice things.

 Onions and firewood drying nicely.

 Chaos/building site/lazy bastard not cleaned up again.

 Garden and orchard with bugger all fruit in it.

Super sharp plot shot.

Too busy to listen to wedding CD music!  Got to get on!  Render Rant coming up soon!

Sunday 24 June 2012

Lime rendering begins.

Fear not with your 1970's council house cement pebble-dash wall fears, it will dry to become white and this is only the first coat of three anyway.  It will end up a nice subtle creamy-white like the earth mortar on the left.


Another rainy, windy day so to avoid housework I have started on the render on the back wall because it's inside the hangar and dry.  Reasonably dry.  Brush down wall, but not too much or there will be no wall left. Spray with hose - using a mister on this wall would take all week due to the amazingly thirsty mud mortar and super porous stone.  The key is to experiment with a wee patch first to avoid catastrophe.  Hopefully.


Coat no.1 is a mix of NHL 3.5 lime and coarse sand, ratio 1 lime, 2 sand, 0.6 water.  It is then rested a bit  and then put back in the mixer when more water is added to make a slurry the consistency of cow shit.  You then chuck it on the wall using your best tennis forehand technique, remembering to put a hard board below to catch it all when it falls off again.  This is normal.  Also cover everything with plastic sheet and cardboard as it goes everywhere.  Fling it on little by little, and after 3 hours of mixing and chucking and slurping tea you get the above mess.  Belters.  Do not touch it afterwards - leave it sagging.  Mist twice a day for 4 days and protect from sun/wind/rain/cats, then on to the second coat (later).  Nothing to it!  No need for builders and their short-cuts, mess and expense, no need for cement (very bad stuff).  Local, sustainable, vernacular, self-sufficient, and you get big forearms.

Friday 15 June 2012

Bread oven chimney down and out


Took forever to get the top off as it was solid concrete.  I managed to get it into three lumps and could just about manage to get them off the top of the chimney stack and resting on my chest like some bloody strongman, wobbling about up a creaking scaffold.  I had to work myself up into a temper to throw them off the top, which must have been amusing for any passers by.  Not that there are any passers by.  Ever.

'AlrightcomeonyoufuckingbastardsandLIFTYOUCUNT-FUCKOFFTWAT!'
weeeeeee-THUD.


Nice alignment.  Might have to dig them out of the lawn...
Then it came down ok as the rest was rubble and mud and I didn't even need a crowbar for most of it!
Upside down house.  Thick hard heavy concrete on top, soft stone and mud below.  Bloody peasants.

Found a use for some old CDs as well.  Always thinking, me.


Pigeons hear that sub-bass and robot-dance themselves to death.  Word.

Sunday 10 June 2012

What Phill needs for breakfast.

Get it down you with a greasy egg sarnie!

Saturday 9 June 2012

A bit of a roof.

One side nearly done.  I made the mistake of pre-cutting the wood on the level floor and then wondered why it just would not fit up there.  Turns out the roof is skewed and the old wood was just wangled in by eye.


The old super-thin slates were turning to compost in our hands so it was a devil of a job to get the old and new to fit together.  The new wood was also a bit thicker so there is a wee bump where the join is, and the line of slate hooks looks a bit wobbly.  Still, not too bad for a first attempt, but I wish we'd been able to spend longer measuring.  Was chucking it down though, so a waterproof roof is better than half a roof neatly done and a wet bedroom!

Nice tight scarfing over the supports.  All oak.

I had to use Spanish slate in the end as no-one produces Breton slate any more.  Pity - the older buildings around here have it and it looks fine to me!

Oak and thick hard slate and stainless steel fixings = a repair job in 200 years or so.

Tuesday 29 May 2012

Wood, oil, dust. Beer.

 Bit of elbow grease and some hot linseed oil makes teak look like teak again.
Absolutely no need for anything else.  Except maybe tung oil.

 Table took all day to scrub, brush, sand and oil.

Practising whittling combs for a prezzie for someone.
Done with this knife.

K's been very busy preparing the walls for pointing.  Looks good! 

 I've been finishing getting rid of the render I couldn't reach until the bread oven had been removed.

New vent for the larder - lime and stone, no PVC in sight.
Going to be covered in a brass sliding vent after the render's been put on.

 Champion of England peas in a fancy zig-zag to make a long row fit a short bed.


Runners sown but not showing yet... 

 Balti chickens looking like chickens...

 Toms taking off in the tunnel.  Pachypodium happy.

 Soft fruit a bit annoying - we've just found a layer of compacted hardcore and clay under the rasps from an old pig yard!  No wonder they were unhappy.

Better drown my sorrows in the best beer I've ever made.
8%, rich and malty with great Fuggles and Goldings finish.
Huzzah!

Friday 25 May 2012

Don't talk the talk...

...if you can't walk the walk.
Phoney builders are outlined in chaux.

One for the Wu-tan fans out there.  Apologies for any music fans also, but hip-hop is not my fault.

Been preparing the walls for rendering, known as dubbing out.  Being hot and dry with very thirsty walls, the lime mortar I put in the bigger holes in the walls has fallen out again.  Wrong sand, maybe.  Also too dry.  Dunno.  It's Another Skill to Learn: back in The Day mortar mixing was a trade like masonry.  The mortar bods would travel the continent making cathedrals out of local sands and limes and had to know their stuff - the evidence that they did is all around.  Me, I'd have been sacked on the first day of building, and probably excommunicated!

Too bloody hot!

Friday 18 May 2012

House renovation progress.

I've been reading some interesting (for me) books and on-line articles about proper building.  Basically, everything you need for a beautiful, healthy, long-lasting building has been thought out and developed hundreds and sometimes thousands of years previously.  Every place on earth has the prefect materials for a decent home.  Here we have oak, slate, stone and earth.  In other places you have bamboo, teak, clay, lime.  It is all just there, out of the window (ok, no windows out there, but you get the idea).  Anything else is generally ugly, polluting and temporary.  I might expand on this later, when I've taken some photos of buildings around here to illustrate my point.

So, I am renovating our house and am trying to use as much locally sourced material as possible, and am recycling as much as I can in a wee journey of discovery of old methods and materials.


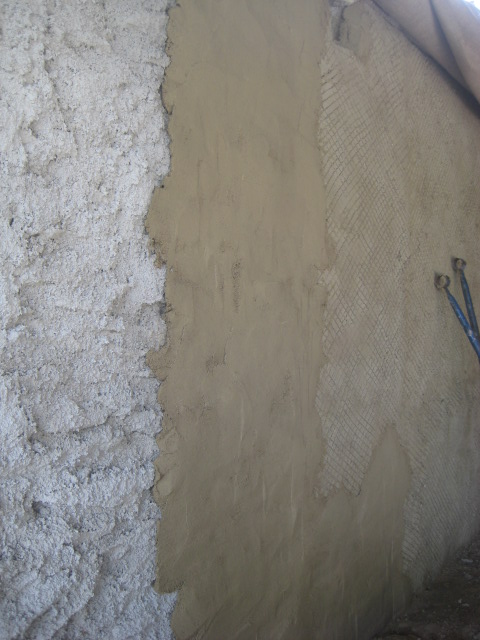
So far I've stripped the cement render off.  I needed an SDS drill for this as the render was almost pure cement and very, very hard.  Renders are there to protect the wall, and act as a sacrificial coating - it wears away so the structure doesn't.  On a rubble stone house with earth mortar with no foundations, movement is inevitable as the soil expands and shrinks during the year.  It's fine.  Cement doesn't move though - it is very strong, impervious and resists movement up to it's breaking point, when it just cracks.  Cracks let in water which then can't get out again.  This equals a cold, damp house.  Cement is great for railway bridge footings, anti-tank emplacements and other grim uses.  This is what it was developed for.  Not for use on houses.


The original stonework is very well put together.  It is basically rubble from the fields bedded with clay sub-soil (mortar is there to spread the load of the stone on top so it doesn't crack - soil is good for this as long as it doesn't wash away), joined very closely like a jigsaw where non of the pieces fit properly and you still have to make a picture.  As you can see, there was a window put in later in the house's history (you can see a rectangular hole to the right of the window which is where the original fireplace wooden beam was - the other was removed for the window to go in) - compare the stonework above it with the original.  De-skilling of society is another rant!


On the other side of the house, we've got the electric coming in and access above the boiler room was difficult so instead of being electrocuted I removed the render in line with the drainpipe to hide the join when the house is re-rendered in haired lime.


Bread oven also gone!  This was going to make way for a new window as we were going to move the bathroom to the lighter, warmer side of the house but the drainage won't work.  Again, look at the white rectangle and the stonework there.  This was a door into the larder, and will be again.  It was just bricked up with concrete blocks and the other side is black with mould.  Not for long though.

Where did the oven go?


Into the hangar!  Two 1m cubed bags of earth mortar and about 4m cubed of very heavy stone, plus a ton of fire-bricks, slate and oak will be made into a workshop floor and a pizza oven in the garden at some point.

Next is repairing and plugging holes, making doorways, vents for larder, re-pointing the front.  Then we're replacing the gable end roof wood (rotten because painted over badly), re-flashing the chimney, re-slating a bit, demolishing the bread oven chimney, then rendering the walls (3 coats plus lime-wash)!

Makes me tired just thinking about it!  Good fun though!

Thursday 17 May 2012

May update

Been busy!  

 Polytunnel is a very good place for 2m high broad beans, which we've been eating since April.

 Nice and neat with tall pea frame looking nice, but it's been too cold and nothing's germinated!

August's barbecue sorted: 12 Coucou de Rennes, eating a sack of feed a week and they're only 5 weeks old! 

New cockerel.  What a bobby dazzler.  Ladies hate him because he jumps on them when they're eating.